

Owning a BlackBerry smartphone makes life much more efficient with the ability to configure your favorite email accounts. Emails get pushed to your device, eliminating the need to jump to a computer to compose or reply. But, how do you get started? Never fear, the Empire is here at your services getting you covered on how to set up email on BlackBerry devices. Continue reading for email configuration steps.
Step 1
Enter the main menu of your BlackBerry device and once you are in the menu try and locate the ‘Setup’ tab or icon.
Step 2
Select the ‘Setup’ tab or icon and from the following menu select ‘Email Settings’ tab or icon. This is the tab which contains all the email related actions and information of the BlackBerry device.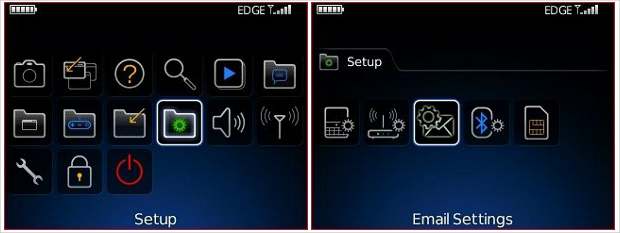
Step 3
Upon selection, the internet settings tab will open up a prompt window that will require you to enter your BlackBerry Internet Service username and password. This username and password can be obtained by the service provider if not known.
Each device has its own unique password and username combination. Once you get the details enter them in the relevant fields.
Step 4
Once the details are matched with the service providers server, the device will open the email account management screen. From this screen you can your existing email accounts as well if any.
If there is no email account configured on the device, it will open a prompt to add an existing email account, by choosing that you can enter the email account you wish to configure on the device. Press ‘add’ to continue.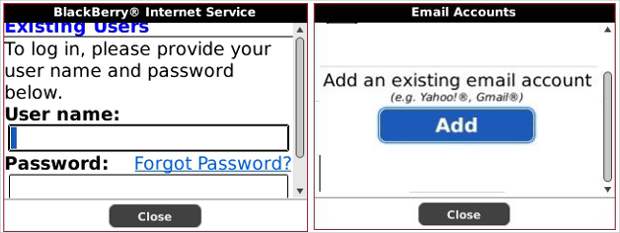
Step 5
The following screen will show you the available choices in terms of email accounts like Gmail, and Hotmail. If your desired email service is not listed, you can also add manual details of the email account to configure it on to your device. So in case you want to configure your organisational email on your device select ‘Other’ and press next.
Step 6
The following screen will show two fields one for each the email address and the other one for the password. Make sure to enter the complete email address for e.g. “XYA @gmail.com.
Once you have entered the information, especially the password, it is a good idea to check the password again by selecting show password option from menu. Following that press ‘next’.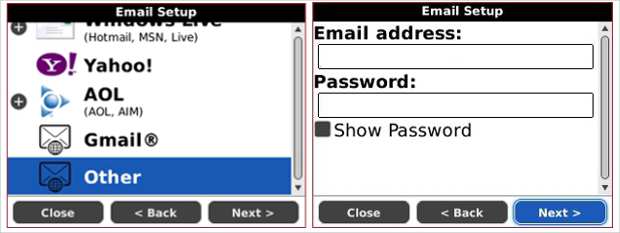
Step 7
The device will then try to locate the server side settings for configuring the email on the device. If the information is not available, the device will prompt you to manually enter the server details or else you can directly choose to enter the server details manually by checking the option ‘I will provide the settings to add this email account’ and press ‘next’.
Step 8
The following screen opens up a prompt to verify the origin of the email account. Here you need to select whether this is a personal email account or an organisational email account.
If you are using an enterprise email account, you will have to upgrade to the BlackBerry BES (BlackBerry Enterprise Service) plan. Consult your service provider for the same.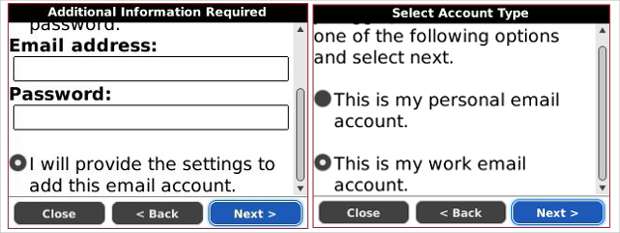
Step 9
The following window will ask for four main details related to the email account configuration these are: – Email address, Username, Password and lastly the email server address.
The username for the email account is the initial name or the prefix of the email account. Server address, however, can be located from the inbox settings menu under the ‘POP mail’ settings tab while accessing the email from a computer. If the detail is not available you can consult the IT personnel in case of organisational email ids or can also ask the service provider for the same.
Step 10
Make sure that before you press the Next key all the details are filled in and are correct. Once you are sure of both, press next. Once the details match the email account will be configured on your device which will be prompted by a SMS alert. Following that the device will synchronise itself with the server and will be ready in about 30 minutes or so.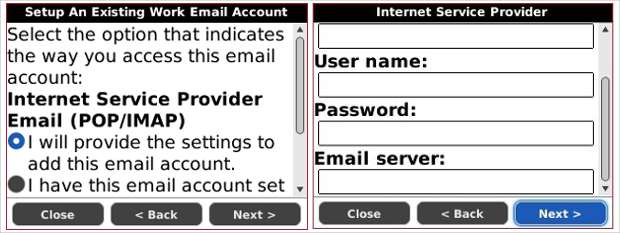
Configuration guide courtesy of themobileindian